搭建部署Ovirt虚拟化环境
分类:笔记 日期:2020-08-11 作者:caocaofff 浏览:2885
简介
oVirt是一种开源分布式虚拟化解决方案,旨在管理整个企业基础架构。 oVirt使用受信任的KVM管理程序,并基于其他几个社区项目构建,包括libvirt,Gluster,PatternFly和Ansible。
功能
为管理员和非管理员用户提供丰富的基于Web的用户界面
主机,存储和网络配置的集成管理
在主机和存储之间实时迁移虚拟机和磁盘
主机发生故障时虚拟机的高可用性
架构

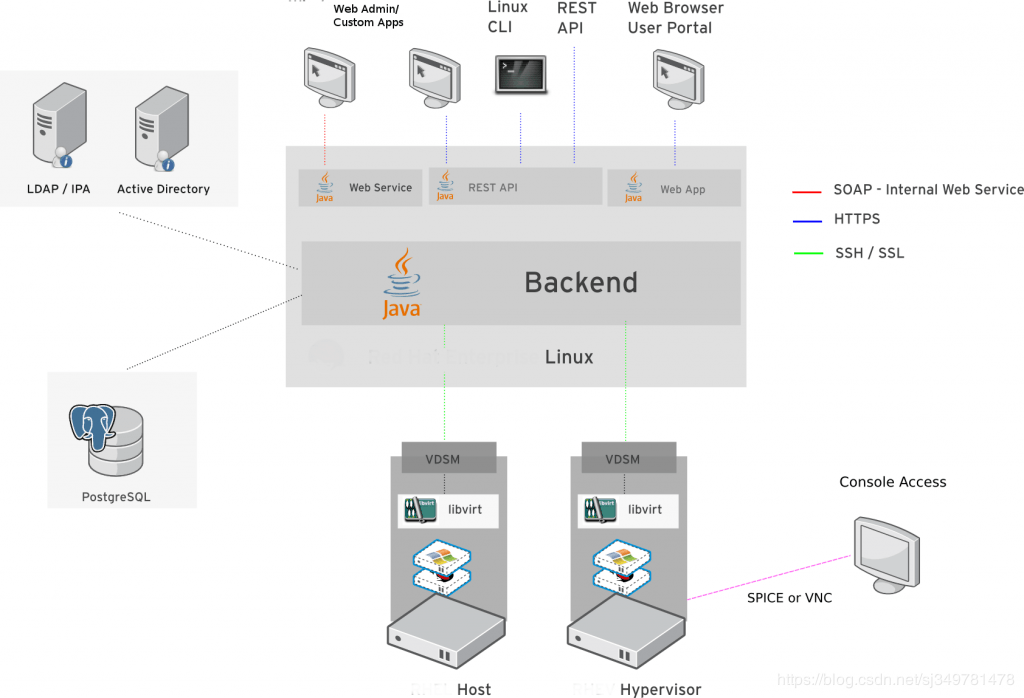
(1)ovirt-engine用于部署,监视,移动,停止和创建VM映像,配置存储,网络等。我们运行虚拟机(VM)的一个或多个主机(节点)一个或多个存储节点,其保存与这些VM对应的图像和ISO。此外,通常在引擎旁边部署身份服务,以对ovirt-engine的用户和管理员进行身份验证。
(2)节点是安装了VDSM和libvirt的Linux发行版,以及一些额外的软件包,可以轻松实现网络和其他系统服务的虚拟化。迄今为止受支持的Linux发行版是Fedora 17或oVirt-node,它基本上是一个精简版本,包含足够的组件以允许虚拟化。
(3)存储节点可以使用块或文件存储,可以是本地或远程,通过NFS访问。 POSIXFS存储类型支持Gluster等存储技术。存储节点分组为存储池,可确保高可用性和冗余。 Vdsm存储术语页面包含更多详细信息。
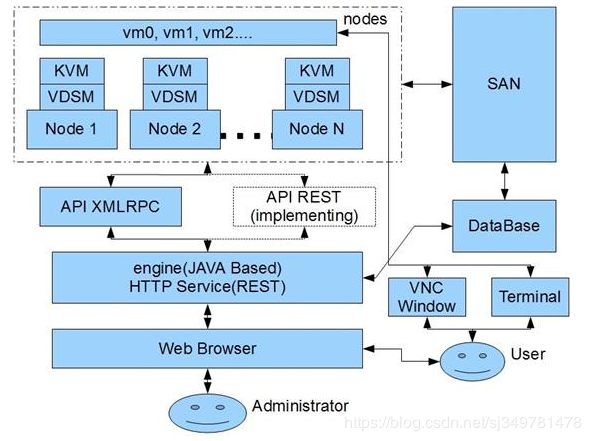
oVirt 逻辑结构图

从总体框架上说明了 oVirt 的工作流程。对外,oVirt 中的 Engine 通过 HTTP 协议向外提供 HTTP API,同时提供内建的网页服务供用户和系统管理员使用。系统管理员通过网页可以创建、修改虚拟机及相关设备或用户权限,用户在拥有权限的情况下可以操作自己的虚拟机,并通过 VNC 或 SSH 登陆自己的虚拟机。
Engine 在整个系统中充当管理者的角色并对外提供管理服务,它挂载了自己的数据库记录整个系统中所有的虚拟机配置,各个节点的自身状态,系统的网络状态,存储器状态。管理的逻辑,状态及策略全部在 Engine 中设置与实现。
Node 只负责功能上的实现,不进行任何状态的记录和任何策略的实现。Engine 与 Node 之间的关系十分像 Linux 中驱动程序与应用程序的功能分割关系:驱动仅仅负责功能的实现,如设备的读、写、开启与关闭,如何使用这些功能留给应用层。同样 Node 仅仅负责实现虚拟机器与设备的创建与修改,资源的共享与保护,如何使用这些功能交给 Engine 处理。Node 暴露两种基于网络的 API 与 Engine 交互,XMLRPC 与 REST。Engine 通过这些接口控制各个 Node 上功能的启动。当然用户也可以调用这些 API 进行第三方程序的开发。
oVirt 里的 Node 可以由一个普通的 Linux 上安装 VDSM(Virtual Desktop Server Manager) 构成,也可以由一个专为 oVirt 定制的 Linux 系统构成。在定制的情况下,Node 上的许多文件系统都是 ramdisk( 基于内存的 Linux 磁盘设备 ),系统重启后其中的内容消失,从而保证了 Node 的无状态性。Engine/Node 的设计不仅方便将来的开发,更简化了用户的安装使用,在定制的情况下 Node 可以快速大量部署。
VDSM 对存储器的管理
每一个 Node 上都会运行一个 VDSM,实现网络、存储器、虚拟机的创建与修改的功能。VDSM 的大部分代码用在了存储系统上,其功能包括数据的组织,集群下的数据共享与保护,故障恢复。通常情况下每一个物理机器当作一个 Node,运行一个 VDSM,Node 本身只携带少量存储器用以保存配置。一个集群中通常有一个 Engine 和数个 Node,这些 Node 通过网络连接到 SAN(Storage Area Network) 上,VDSM 把 Node 上运行的虚拟机存储数据保存在 SAN 上,Node 本身为无状态的节点,重新启动后状态消失,从而保证了系统整体的可用性,一般情况下不会因用户的操作而使 Node 失效。一旦问题发生,通常一次重启既可恢复工作状态。
最后总结一下VDSM得功能:libvirtd是管理虚拟化得工具,vdsm理解为是一个代理软件,rhvm的ovirt-engine与vdsm通信,vdsm把请求发给node节点上的vdsm。oVirt-engine与node节点都与要安装vdsm,oVirt-engine是管理端,node是被管理端。
介绍部分参考:https://blog.csdn.net/sj349781478/article/details/104598197/
部署步骤
准备硬件:
计算节点:一台或多台配置强大的服务器,比如 16核+、32G+、SSD 1T+,单网卡,网络必须能同时连内外网,或者双网卡,分别连接内网和外网(外网的作用是在新建计算节点时需要自动安装软件,节点安装完成后可以断开外网);
控制节点:一台配置要求一般的PC或服务器,甚至你可以用虚拟机
准备软件:
CentOS7以上版本操作系统镜像:
https://mirrors.tuna.tsinghua.edu.cn/centos/7.8.2003/isos/x86_64/CentOS-7-x86_64-DVD-2003.iso
oVirt4.3.10(4.4已发布,可以使用最新版,但官方下载速度慢)
(内含node iso、engine rpm、tools iso、virt-viewer)
链接:https://pan.baidu.com/s/10HarsPsucmovfF-jDH4aEw
提取码:pu1s
小提示:网盘中的rpm安装包无需下载。
控制节点
先在裸机最小化安装CentOS,过程不再叙述,安装完成后连接外网,执行下面脚本
#创建ISO存储域所使用的目录,并赋予权限
mkdir /iso
chown -R 36:36 /iso
echo " SELINUX=disabled" >> /etc/selinux/conf
systemctl stop firewalld
systemctl disable firewalld
yum -y update
yum -y install ovirt-engine
engine-setup  --offline
echo " SSO_CALLBACK_PREFIX_CHECK=false" >> /etc/ovirt-engine/engine.conf.d/gg-sso.conf
engine-config -s DefaultWindowsTimeZone="China Standard Time"
service ovirt-engine restart
注意,安装过程中会有交互提示,需要配置引擎设置,可以参考下面:
–== PRODUCT OPTIONS ==–

      Configure Engine on this host (Yes, No) [Yes]: 回车
      Configure ovirt-provider-ovn (Yes, No) [Yes]: 回车(OVN:Open Virtual Network,配置虚拟网络)
      Configure Image I/O Proxy on this host (Yes, No) [Yes]: 回车(Image I/O Proxy可以支持向oVirt平台中上传虚拟机的磁盘镜像)
      Configure WebSocket Proxy on this host (Yes, No) [Yes]: 回车(WebSocket Proxy用来支持使用noVNC远程登录虚拟机图形界面管理)

      * Please note * : Data Warehouse is required for the engine.
      If you choose to not configure it on this host, you have to configure
      it on a remote host, and then configure the engine on this host so
      that it can access the database of the remote Data Warehouse host.
      Configure Data Warehouse on this host (Yes, No) [Yes]: 回车(在本机配置数据库)
      Configure VM Console Proxy on this host (Yes, No) [Yes]: 回车(支持访问虚拟机的串口console通信)

      –== PACKAGES ==–

[ INFO  ] Checking for product updates…
[ INFO  ] No product updates found

      –== NETWORK CONFIGURATION ==–

      Host fully qualified DNS name of this server [localhost.localdomain]: 回车(使用默认hostname就行,反正是准备用IP地址访问无所谓)
[WARNING] Failed to resolve localhost.localdomain using DNS, it can be resolved only locally
      Setup can automatically configure the firewall on this system.
      Note: automatic configuration of the firewall may overwrite current settings.
      NOTICE: iptables is deprecated and will be removed in future releases
      Do you want Setup to configure the firewall? (Yes, No) [Yes]: no回车(因为之前已经把防火墙服务给关掉了,所以就不用再配置防火墙的具体设置了)

      –== DATABASE CONFIGURATION ==–

      Where is the DWH database located? (Local, Remote) [Local]: 回车(DWH:Data WareHouse使用本地数据库)
      Setup can configure the local postgresql server automatically for the DWH to run. This may conflict with existing applications.
      Would you like Setup to automatically configure postgresql and create DWH database, or prefer to perform that manually? (Automatic, Manual) [Automatic]: 回车(自动配置PostGreSQL数据库)
      Where is the Engine database located? (Local, Remote) [Local]: 回车(Engine用到的数据库位于本机)
      Setup can configure the local postgresql server automatically for the engine to run. This may conflict with existing applications.
      Would you like Setup to automatically configure postgresql and create Engine database, or prefer to perform that manually? (Automatic, Manual) [Automatic]: 回车(使用安装程序自动创建Engine数据库)

      –== OVIRT ENGINE CONFIGURATION ==–

      Engine admin password: 输入后台管理员admin的密码回车
      Confirm engine admin password: 再输入一遍密码回车
      Application mode (Virt, Gluster, Both) [Both]: 回车
      Use default credentials (admin@internal) for ovirt-provider-ovn (Yes, No) [Yes]: 回车(使用默认的admin@internal内部管理员账号)

      –== STORAGE CONFIGURATION ==–

      Default SAN wipe after delete (Yes, No) [No]: 回车(yes的话在删除虚拟机的虚拟磁盘后会擦除存储设备上的对应块)

      –== PKI CONFIGURATION ==–

      Organization name for certificate [localdomain]: 回车

      –== APACHE CONFIGURATION ==–

      Setup can configure the default page of the web server to present the application home page. This may conflict with existing applications.
      Do you wish to set the application as the default page of the web server? (Yes, No) [Yes]: 回车(使用apache作为web服务器)
      Setup can configure apache to use SSL using a certificate issued from the internal CA.
      Do you wish Setup to configure that, or prefer to perform that manually? (Automatic, Manual) [Automatic]: 回车(自动配置CA证书)

      –== SYSTEM CONFIGURATION ==–


      –== MISC CONFIGURATION ==–

      Please choose Data Warehouse sampling scale:
      (1) Basic
      (2) Full
      (1, 2)[1]: 回车(使用基本的数据库示例初始化数据)

      –== END OF CONFIGURATION ==–

[ INFO  ] Stage: Setup validation
[WARNING] Cannot validate host name settings, reason: resolved host does not match any of the local addresses
[WARNING] Warning: Not enough memory is available on the host. Minimum requirement is 4096MB, and 16384MB is recommended.
      Do you want Setup to continue, with amount of memory less than recommended? (Yes, No) [No]: yes回车(因为是在虚拟机上装的,内存有点小,才会提示这个)

      –== CONFIGURATION PREVIEW ==–

      Application mode                        : both
      Default SAN wipe after delete           : False
      Update Firewall                         : False
      Host FQDN                               : localhost.localdomain
      Configure local Engine database         : True
      Set application as default page         : True
      Configure Apache SSL                    : True
      Engine database secured connection      : False
      Engine database user name               : engine
      Engine database name                    : engine
      Engine database host                    : localhost
      Engine database port                    : 5432
      Engine database host name validation    : False
      Engine installation                     : True
      PKI organization                        : localdomain
      Set up ovirt-provider-ovn               : True
      Configure WebSocket Proxy               : True
      DWH installation                        : True
      DWH database host                       : localhost
      DWH database port                       : 5432
      Configure local DWH database            : True
      Configure Image I/O Proxy               : True
      Configure VMConsole Proxy               : True

      Please confirm installation settings (OK, Cancel) [OK]: 回车
安装完成后,oVirt的Web UI管理界面将启动。浏览到https:// [Hosted Engine的名称] /,开始使用oVirt!
计算节点
使用网盘里的ovirt-node-ng-installer-4.xxx.iso安装,这个ISO实际是一个定制的CentOS,安装过程中无需配置分区信息或安装模式,全部自动化安装。
安装后,用浏览器打开Engine后台,可以开始添加数据中心、集群、主机了。
新手步骤可以参考:https://blog.csdn.net/sukysun125/article/details/89916583
网盘里的msi安装包是VNC浏览器,在虚拟机列表点击虚拟机的控制台会自动下载一个vv文件,双击打开就能自动打开虚拟机的控制台了。
制作镜像时,Windows需要安装spice-guest-tools-latest.exe,Ubuntu、opensuse系 需要执行
#!/bin/bash
REPOURL = http://download.opensuse.org/repositories/home:/evilissimo:/ubuntu:/18.04/xUbuntu_18.04/
#REPOURL = http://download.opensuse.org/repositories/home:/evilissimo:/ubuntu:/16.04/xUbuntu_16.04/
#REPOURL = http://download.opensuse.org/repositories/home:/evilissimo:/ubuntu:/14.04/xUbuntu_14.04/
echo 'deb  $REPOURL /' >> /etc/apt/sources.list.d/ovirt-guest-agent.list
wget $REPOURL/Release.key
apt-key add - < Release.key
#其实以上步骤可以不需要,直接执行下面就行
apt-get update
apt-get install ovirt-guest-agent
service ovirt-guest-agent start
Centos、Fedora系 需要执行
#!/bin/bash
yum -y install epel-release
yum -y install ovirt-guest-agent-common
systemctl enable ovirt-guest-agent.service && systemctl start ovirt-guest-agent.service
只有安装了这些Guest-Tool,你在虚拟机列表才能直接看到IP地址。
官网的资料已经很健全了,可以去看看:https://www.ovirt.org/
CC版权: 本篇博文采用《CC 协议》,转载必须注明作者和本文链接
评论 (暂无评论)
